Grantee Guide
Step 1: Getting Started
- Confirm your participation in the program! Follow the link in your award email to accept your grant.
- Before you start your project, remember to take “before” photos of your project area. You will need to take “after” images once your project is completed.
- Attend the kick-off webinar (you will be emailed details) or watch last year’s webinar recording (see below).
- Review reimbursable project expenses in the Eligible Expenses Guide. Review the Lawns to Legumes Participant Agreements before starting your project.
- All grantees will have access to “The Hive!” The Hive is a community platform for grantees. You will receive an email to access The Hive. Connect, share resources, get answers from coaches, and get program updates from L2L staff.
- Read the guide below! Or, download a printable version:
- Print out a one-page checklist to keep track of your project throughout the grant period.
Watch our Spring 2026 Grantee Kick-Off Webinar. Closed captioning is available on YouTube. Download the presentation slides here.
Watch our Spring 2026 Q+A Session. Click here for a PDF of the questions and answers. Closed captioning is available on YouTube, and a version with ASL interpretation is available here.
Watch the Spring 2026 Pollinator Plantings Project Webinar. Metro Blooms Design+Build landscape designers Jennifer Ehlert and Jennifer Moeller cover the fundamentals of completing pocket plantings (including rain gardens), pollinator-friendly tree/shrub plantings, and pollinator meadows.
Watch the Spring 2026 Pollinator Lawns Project Webinar. Twin City Seed Company conservation specialist James Wolfin walks through the steps for converting your turfgrass lawn to a flowering bee lawn.
Prefer a more interactive way of learning? We worked with a former Lawns to Legumes grantee to develop an online course that walks through the content of the Kick-Off Webinar. The course takes approximately one hour to complete.

Stay Updated!
If you are a current Lawns to Legumes grantee, you will receive regular email newsletters from Blue Thumb. If you are not receiving emails or would like to update your email address, let us know at l2lhelp@bluethumb.org.
Spring 2026 Grantee Newsletters
- July Newsletter (Reimbursement request tips, staying connected, other grant opportunities)
- June Newsletter (Maintenance tips, Garden Tour Day, L2L Habitat at Home)
- May Newsletter (Reimbursement request form open, planting tips)
- April Newsletter (Spring gardening tips, tracking purchases, finding native plants)
- March Newsletter (Native Plant Nurseries, Spring Plant Sales, webinar links)
- Welcome Email (Resources and important links)
Step 2: Choose Your Project
The best way to protect native bumblebees and other pollinators is to plant a diversity of native floral species. We recommend selecting a project type that meets your needs for your yard while supporting as many pollinator species as possible. But don’t bite off more than you can chew! It’s better to have a smaller, successful project than a bigger project that you’re unable to finish or maintain.
Choose one (or a combination) of the following for your Lawns to Legumes project:

Pocket Planting |

Native Trees/Shrubs |

Pollinator Lawn |

Pollinator Meadow |

Container Planting |
Pocket Plantings are small native gardens that pack a punch in terms of pollinator impact without taking up much space. They are a great way to get started if you are new to gardening, or want to expand your existing garden. Choose species that bloom in all three growing seasons (spring, summer, and fall) for the biggest impact. Variations of a pocket planting include rain gardens and shoreline plantings.
Flowering native trees or shrubs can provide as much pollinator forage as an entire garden. Early bloomers like willow provide high quality pollen for emerging bumble bees when few other resources are available
Pollinator Lawns with low-growing fescues and flowering species offer less support for pollinators compared to a small garden or tree planting. However, they offer a realistic option if you frequently use your yard for activities like recreation and are still a better choice for pollinators than a typical turfgrass lawn. If incorporating a pollinator lawn in your yard, we strongly encourage prioritizing native species over non-natives when possible. See exceptions in the Eligible Expenses Guide.
Pollinator Meadows, expansive areas with a diversity of native plant species, are the most beneficial choice for supporting as many pollinators as possible. If you have the time and space to create a pollinator meadow, go for it! The easiest way to achieve this might be to plant pocket gardens side by side, eventually creating a meadow that takes up your full yard.
Container Plantings are a great option if you live in an apartment or don’t have outdoor space for a garden. You can still help pollinators by planting native plants in pots on your balcony or porch, and native container plantings can thrive for years with proper care.
Want to see completed pollinator habitat projects by previous Lawns to Legumes grantees? Browse the Lawns to Legumes Garden Gallery for examples and inspiration!
Step 3: Plan and Install Your Project
Make a plan. Check out the Minnesota Board of Water and Soil Resources’ Planting for Pollinators Design Guide, our Plan a Project page for detailed guidance on your specific project. Feel free to download our Project Tracking Spreadsheet or make your own.
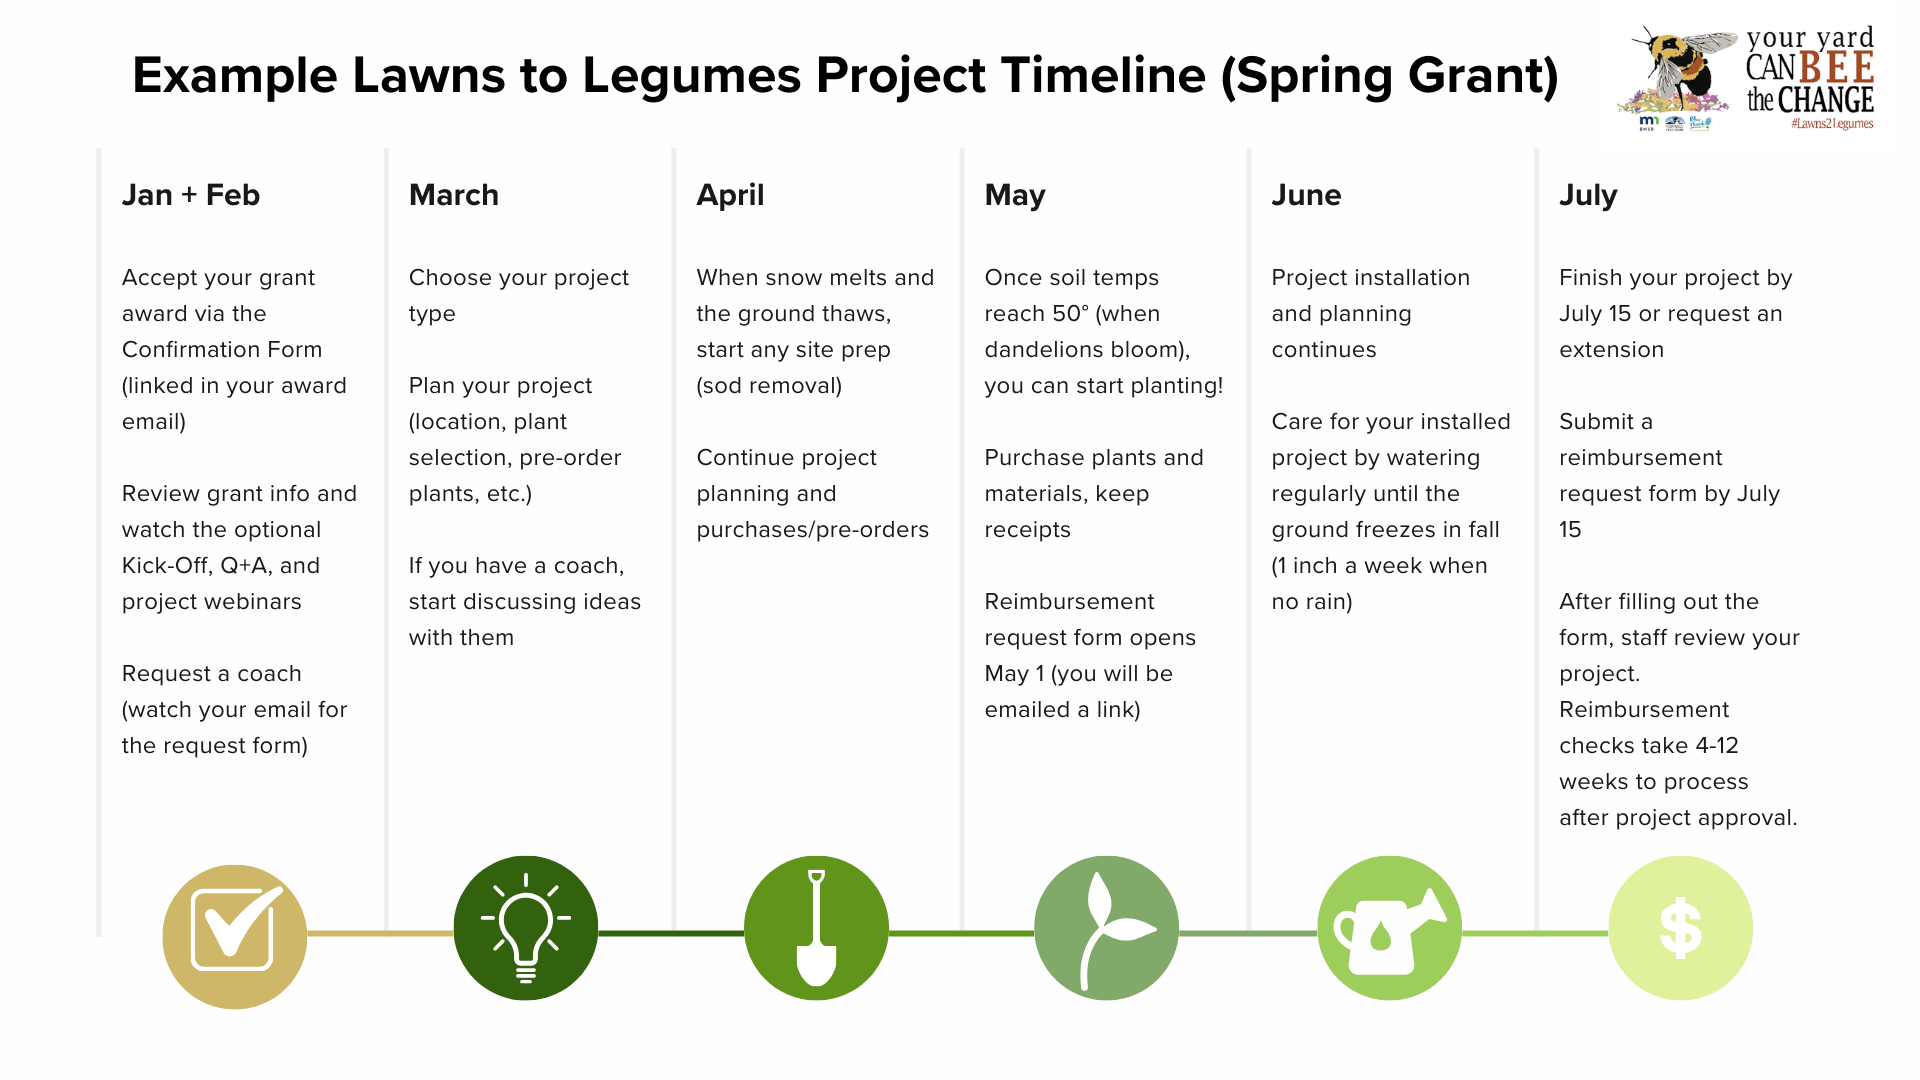
Click to enlarge the example project timeline below.
- Prepare your planting site. Use our Quick Guide to Site Preparation to determine which site prep method is best for your project.
- Choose what plants to purchase. Use the Blue Thumb Plant Finder Tool, or check out the native plant lists and design templates on our Resources page. Before buying plants and materials, review the Eligible Expenses Guide.
- Note that only native Minnesota plants can be reimbursed. Check the native range of a plant using Google, the USDA PLANTS database, or the Minnesota Wildflowers website.
- Non-native cultivars, “nativars,” hybrids and annuals are not eligible for reimbursement. Need help telling the difference between a native plant and cultivar? Review our Native Plants vs Cultivars handout.
- Decide where to buy your native plants. We recommend choosing vendors from our Native Plant Nurseries and Retailers page. If you don’t have a nursery near you, many on our list offer delivery. Don’t forget to save your receipts!
- Start planting! The best window to plant Minnesota native perennials in spring is typically early May through mid-June, depending on your project. Wait until soil temperatures stay above 50°F, or when dandelions start blooming. If you’re planting plugs, check out this quick how-to video!
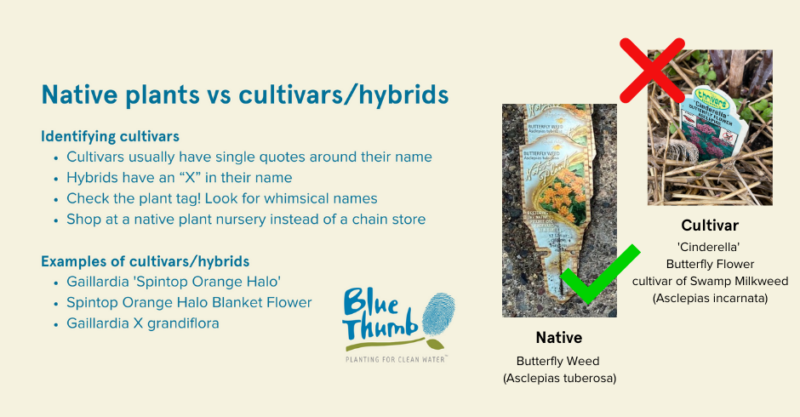
Cultivars are not reimbursed by the Lawns to Legumes program. Learn how to tell the difference between native plants and cultivars here.
Step 4: Complete your Project!
- When your project is complete, submit your project on our Request Reimbursement Form.
- On May 1st, Spring 2026 grantees will receive an email with a link to your Reimbursement Request Form on Submittable. Once open, you can also access the Reimbursement Request Form via the following steps:
- Log into your Submittable account using the email associated with your grant.
- Once logged in, you will arrive on the My Submission page. Go into your Lawns to Legumes submission by clicking on the bold and underlined submission number. Select the Forms tab and scroll to the Additional Forms section. Open the Lawns to Legumes Spring Reimbursement Request form.
- The Spring 2026 deadline for completing your project and filling out the Reimbursement Request Form is July 15, 2026.
- Grantees can request up to $400 in reimbursement for eligible expenses. Here’s what you’ll need:
- Size of your project: You’ll need to estimate the size of your pollinator habitat in square feet or acres.
- Before and After photos: Don’t worry if they’re not pretty! We just want to see that you successfully installed your project. Try to take your photos from a similar angle. Take photos of the whole project area, not individual plants. If you planted in multiple areas, take a before and after photo of each area.
- Receipts: Receipts must be legible and meet the following requirements:
- The date of purchase and name of the retailer/nursery/business you made the purchase from are visible. (Receipts must be from purchases made on or after the date you were notified of your grant award.)
- Purchased plants are native (with a few exceptions noted on the Eligible Expenses Guide).
- If your receipts are not itemized, you will need to submit a list of plant names or a photo of your plant tags.
- If your receipt includes purchases that are not part of your L2L project, circle or highlight the purchases you are requesting reimbursement for.
- Time spent on your project: You’ll need to share an estimate of the total number of hours you spent working on your project. This can include time spent planning and watching L2L webinars.
- Please be patient as we send out your check and sign. There may be delays, but we are doing our best to review and approve reimbursement requests as they come. Once you receive your check, please deposit it within 90 days or your check will be voided.
- Don’t forget to water and weed your new planting! For project maintenance tips, check out our Project pages and Resources page.
-
If you are a Fall 2024 or Spring 2025 grantee and have an extension, you can fill out our Reimbursement Request Form for Extensions on our website. Fall 2025 and Spring 2026 grantees access their form via Submittable (see the steps above).
Spring 2026 deadline: July 15, 2026
Frequently Asked Questions
Have a question? Check our FAQ to see if it’s been already answered!
If you can’t find the information you are looking for, email us at L2Lhelp@bluethumb.org.
Garden Gallery
Every Lawns to Legumes project is unique. Browse projects by previous Lawns to Legumes grant recipients for ideas and inspiration!
 |
 |
 |
 |
 |